Hybrid projects can seem a bit intimidating if you’ve never tried, but today I want to show you just how easy it is! In the coming weeks I’m going to do a series of technique tutorials and challenges, but today I want to start with the very basics, using a template. If you can use a layout template, you can use a hybrid template! For the purposes of this tutorial, I’m going to start at square one, but still read along - you might pick up a tip or two along the way!
First of course you’ll need one of my templates! Find them in
my store at Brownie Scraps, or else check out the
monthly hybrid challenge!
You will need to have a photo editing software such as Photoshop, Photoshop Elements, or
Pixlr - a free program that runs online, you don’t even need to download anything! I have only played with it a little bit, but it seems to be set up similar to Photoshop. If you are using it and have questions, let me know - I will do my best to help!
When you unzip, you will find the template in multiple formats: PSD - to use in Photoshop or Photoshop Elements, TIFF - to use with PS, PSE and other programs (smaller than a PSD), individual PNG layers - to use with Pixlr and other software, and a PDF - this is the outline only that you can print on colored cardstock if you don’t want to customize it with digital kits. Pick what format works best for you. I also include step by step instructions for 3D templates. If you’re not sure how a template is going to be put together, it’s a good idea to print the PDF version and do a trial run. That way you don’t waste color ink! And if you ever have any questions about a template or hybrid in general - before or after you purchase - please don’t hesitate to contact me! You can email me at
wendybirddesigns@gmail.com or message me at Brownie Scraps, my username is WendyBird.
I use Photoshop CS2, so that’s what you’ll see in the tutorial along with a PSD file.
I will be using
Boxed In Vol. 5: Put a Lid On It, which you can get free for the rest of this month for the
March Hybrid Challenge!

Open the template either by double clicking on it on the file, or by choosing
File > Open in Photoshop. It’s always a good idea to go ahead and save the template under another name so that you don’t accidentally save over the original.
This particular template prints on two 8.5 x 11 sheets of paper. For now, we’re just working with the box bottom.
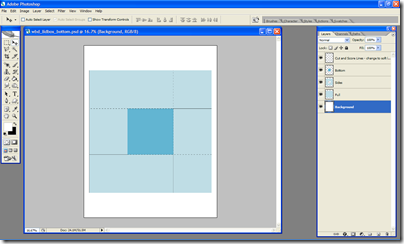
You will notice that I include a layer that is the full shape, as well as layers that you may want to customize.
There is also a layer that is your cut and score lines, but we’ll talk about that one more later. Some templates also have a layer labeled “DELETE”. This is simply a guideline for you to be able to see which part of the template is what and which direction will end up being up.
Next you’ll need to choose that paper you’re going to use to decorate your template. I’m using
Giddy Up Girl by FlutterbyeFaery Designs

Bring your paper into Photoshop either by dragging it into your workspace or by choosing
File > Open
Drag your paper onto your template canvas (hold shift to keep it centered).

Here’s a close up of my layers at this point. I am going to make my box bottom all the same paper, so I’ve turned off the layers that separate the bottom and sides. You can delete them completely.
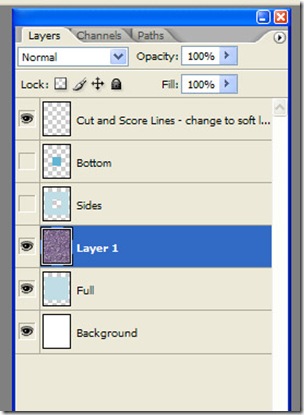
We want to use a clipping mask to “cut” the paper in the shape of the template. Make sure that your paper is the layer above the shape you’re going to clip it to. There are a few ways to create your clipping mask - you can choose from the menu
Layer > Create Clipping Mask, you can do Ctrl/Command+Alt+G on your keyboard, or you can use my preferred shortcut - hold down alt and hover your mouse between the two layers until it turns into two intertwined circles, then click your mouse.

Resize your paper and move it until you are satisfied with how the pattern falls.
Now for your Lines layer. If you leave them black, they will really stand out on your finished project and you should have your great handiwork noticed - not the lines! Here’s an example where I forgot to make any adjustments. It really detracts from the cuteness!

To make the lines just dark enough to see for assembly we want to change our blending mode of the lines layer. The easiest way to do this is to change it to Soft Light. This will change the lines to the color of the paper under them.
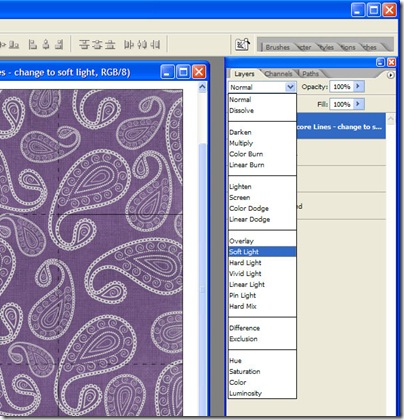
If your paper is very light or very dark, they may disappear completely. If this happens, change your blend mode back to normal but lower the opacity to about 20%. As a rule, I got about 5% lighter than I think I need to - they will still print enough for you to see when it’s flat but they will blend in once they’re folded.
After you’ve done this, you can flatten your layers and print! Check out my post the forum
here for printing tips.
If the template goes together in a way that the back of the page will be seen, I like to print on the back side of my paper too. In this example, the back of the page becomes the inside of the box. I generally don’t like to see any plain white cardstock on my projects. It is pretty impossible to get the front and back of your paper lined up exactly, so I will print a full page. The little bit of extra ink it takes is worth it to me to get rid of that offensive white! haha
From there, just follow the instructions to put together your project and enjoy!
In the coming weeks, I’ll take you through some basic assembly tutorials and some advanced techniques! If there is anything you’d like to learn how to do, just leave a comment or drop me a line!


