Photobucket

The blog has moved! Please visit wendybirddesigns.net for the latest news and updates!

Showing posts with label tutorial. Show all posts

Friday, June 17, 2011

Father’s Day Treat Bags

With Father’s Day just a few days away, I wanted to share the cute treat bags I made!

dads-day-bags

I used Dad’s Day by Scraps by Mara and Blue Heart Scraps, which is the full sized kit you get for FREE if you’re a June Brownie Addict! 

Not an Addict?   It’s not too late!  For $10, you get Game On –the Mega Kit and Add On, Dad’s Day –the full size kit, You Are my Sunshine –the mini kit, plus freebies –2 alphas, word tags and templates!  Check out all the previews HERE

The July Brownie Addicts is available now too, just $7 before July 1st, then it goes up to $10!

Ok, back on track lol

I also used my Treat Me Template

I cut the flap into a “W” shape to resemble a shirt collar and inked the edges so that they didn’t just blend in, then I printed patterned papers onto regular copy paper for the origami ties.  You don’t want to use cardstock for them because there is lots of folding.

I practiced both with unprinted paper, to get the hang of the folds and figure out what size was going to work best.

For the neck tie, I used this tutorial from the Operation Write Home blog.  I started with a 4” square, just like their instructions.  If you want a diagonal striped tie like mine, make sure that your square is cut in line with the stripes (vertical or horizontal).  Because it gets folded on the diagonal, starting with diagonal stripes finishes with straight stripes.

dads-day-bag-tie

For the bow tie, I used this video tutorial on VideoJug. They use a dollar bill, which is 2.5” x 6”.  This turned out a little big for this bag, so I started with 2”x5.5” instead.

dads-day-bag-bowtie

It’s kind of hard to see in the pictures, but the ties have great dimension on them, they are puffy and realistic! 

I just used some double stick tape to adhere the ties to the flaps.

I finished off the bow tie bag with some shirt buttons and closed the flaps with repositional adhesive.  Velcro or magnets would work too and help give the collar some extra dimension too!  Slip a gift card or some candy inside and you’re all set for Father’s Day!

Sunday, March 27, 2011

Scoring Lines Tutorial

Looking for previous tutorials?  Search “tutorial” on the left side.

Scoring your lines is a very important step in assembling your hybrid project.  Card stock and other heavy weight paper does not fold cleanly like copy weight or notebook paper.  Scoring your lines creates an indentation that breaks down the fibers of the paper to give it a guideline to fold.

Scoring your lines is the difference between this:

  13

And this:

14

There are a range of tools you can use to score your folds and today I’m going to take you through some of them - including what you already have at home!

I’m going to start with my favorite - the Martha Stewart Scoring Board.  It retails for 19.99 but if you buy it at a chain craft store like Michaels or JoAnn, make sure you use a 40% or 50% off coupon!

2

It comes with a small bone folder and an envelope guide that slides into a compartment underneath.  There is also a storage compartment at the top for the bone folder.

5

I added the red line using a Super Fine Point Sharpie.  This is a huge help when you’re scoring lines that aren’t perpendicular or parallel to a straight edge.

There are comparable scoring boards on the market, like the Scor-Pal and the Scor-it-All, but the Martha Stewart is the lowest priced and is also the only one with grooves every 1/8 inch.  You also won’t find the others at most chain stores.

3

The bone folder that comes with this scoring board does the job, but it’s pretty thin and the edges are a bit sharp.  It’s not very comfortable in my hand and if you use too much pressure it can break through the paper.  This is a risk with most scoring tools though, so I recommend practicing on scrap paper no matter what method you’re using.

Because I wasn’t completely satisfied with it, I upgraded to the Martha Stewart Bone Folder. (Use a coupon!)

7

It is a much heavier weight and rounded so it is much more comfortable to use.  Because it is wider, it also doesn’t fit all the way down in the groove like the thin one so it won’t break through the paper.

9

The bone folder is also a great tool for creasing your folds.  This helps give them that sharp crease.

10

If you don’t have a scoring board, you can also use the bone folder on it’s own.  If you have a steady hand, you can freehand it or else use it with a ruler.

8

You’ll have best results if you have something underneath your paper that has a bit of give to it, such as a self healing mat, a mouse pad or magazine. 

If you have a paper trimmer (I have this Cricut one), you can use a scoring blade instead of a cutting blade.

12

This is one you definitely want to practice with.  It’s very easy to break through the paper - I usually do 3 or 4 very light passes.

If you don’t have any special paper crafting tools, don’t worry, you can still get great results!  Grab a butter knife and 2 magazines (or a ruler and a magazine…or a mouse pad and a magazine - something to use as a straight edge and something to pad underneath).  Use the back side of the butter knife - not the side the the little serrations. 

11

Final tip: When you’re scoring your folds, the ridge that is created on the underneath should be the inside of the fold. 

Are you ready to find a new project to practice on?  Use coupon code Scoring311 to get 25% off your purchase from my store before 4/3/11

Sunday, March 13, 2011

Using a Hybrid Template

Hybrid projects can seem a bit intimidating if you’ve never tried, but today I want to show you just how easy it is!  In the coming weeks I’m going to do a series of technique tutorials and challenges, but today I want to start with the very basics, using a template.  If you can use a layout template, you can use a hybrid template!  For the purposes of this tutorial, I’m going to start at square one, but still read along - you might pick up a tip or two along the way!

First of course you’ll need one of my templates!  Find them in my store at Brownie Scraps, or else check out the monthly hybrid challenge!

You will need to have a photo editing software such as Photoshop, Photoshop Elements, or Pixlr - a free program that runs online, you don’t even need to download anything!  I have only played with it a little bit, but it seems to be set up similar to Photoshop.  If you are using it and have questions, let me know - I will do my best to help! 

When you unzip, you will find the template in multiple formats: PSD - to use in Photoshop or Photoshop Elements, TIFF -  to use with PS, PSE and other programs (smaller than a PSD), individual PNG layers - to use with Pixlr and other software, and a PDF - this is the outline only that you can print on colored cardstock if you don’t want to customize it with digital kits.  Pick what format works best for you.   I also include step by step instructions for 3D templates.  If you’re not sure how a template is going to be put together, it’s a good idea to print the PDF version and do a trial run.  That way you don’t waste color ink!  And if you ever have any questions about a template or hybrid in general - before or after you purchase - please don’t hesitate to contact me!  You can email me at wendybirddesigns@gmail.com or message me at Brownie Scraps, my username is WendyBird.

I use Photoshop CS2, so that’s what you’ll see in the tutorial along with a PSD file. 
I will be using Boxed In Vol. 5: Put a Lid On It, which you can get free for the rest of this month for the March Hybrid Challenge!
wbd_lidbox_preview
Open the template either by double clicking on it on the file, or by choosing File > Open in Photoshop.  It’s always a good idea to go ahead and save the template under another name so that you don’t accidentally save over the original.

This particular template prints on two 8.5 x 11 sheets of paper.  For now, we’re just working with the box bottom.
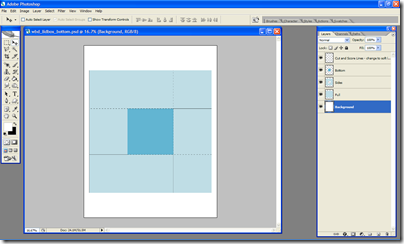
image
You will notice that I include a layer that is the full shape, as well as layers that you may want to customize. 

There is also a layer that is your cut and score lines, but we’ll talk about that one more later.  Some templates also have a layer labeled “DELETE”.  This is simply a guideline for you to be able to see which part of the template is what and which direction will end up being up. 

Next you’ll need to choose that paper you’re going to use to decorate your template.  I’m using Giddy Up Girl by FlutterbyeFaery Designs


Bring your paper into Photoshop either by dragging it into your workspace or by choosing File > Open
Drag your paper onto your template canvas (hold shift to keep it centered). 
image

Here’s a close up of my layers at this point.  I am going to make my box bottom all the same paper, so I’ve turned off the layers that separate the bottom and sides.  You can delete them completely.
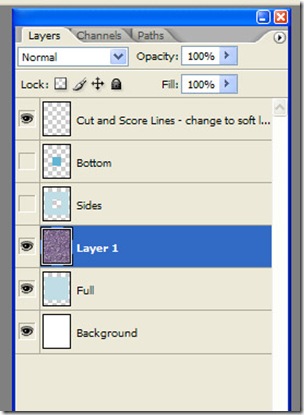
layers1

We want to use a clipping mask to “cut” the paper in the shape of the template.  Make sure that your paper is the layer above the shape you’re going to clip it to.  There are a few ways to create your clipping mask -  you can choose from the menu Layer > Create Clipping Mask, you can do Ctrl/Command+Alt+G on your keyboard, or you can use my preferred shortcut - hold down alt and hover your mouse between the two layers until it turns into two intertwined circles, then click your mouse.  

2

Resize your paper and move it until you are satisfied with how the pattern falls. 

Now for your Lines layer.  If you leave them black, they will really stand out on your finished project and you should have your great handiwork noticed - not the lines!  Here’s an example where I forgot to make any adjustments.  It really detracts from the cuteness!


To make the lines just dark enough to see for assembly we want to change our blending mode of the lines layer.  The easiest way to do this is to change it to Soft Light.  This will change the lines to the color of the paper under them.  
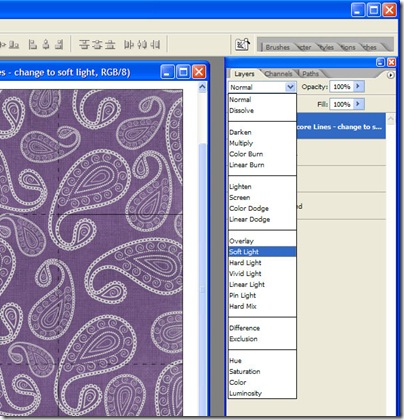
3

If your paper is very light or very dark, they may disappear completely.  If this happens, change your blend mode back to normal but lower the opacity to about 20%.  As a rule, I got about 5% lighter than I think I need to - they will still print enough for you to see when it’s flat but they will blend in once they’re folded.
After you’ve done this, you can flatten your layers and print!  Check out my post the forum here for printing tips

If the template goes together in a way that the back of the page will be seen, I like to print on the back side of my paper too.  In this example, the back of the page becomes the inside of the box.  I generally don’t like to see any plain white cardstock on my projects.  It is pretty impossible to get the front and back of your paper lined up exactly, so I will print a full page.  The little bit of extra ink it takes is worth it to me to get rid of that offensive white! haha

From there, just follow the instructions to put together your project and enjoy!

In the coming weeks, I’ll take you through some basic assembly tutorials and some advanced techniques!  If there is anything you’d like to learn how to do, just leave a comment or drop me a line!

Sunday, June 13, 2010

Topiary Hybrid Tutorial

I have been working on this hybrid project for more than a week now so I am excited that it is finally done and I can show it off!

topiary-2

I saw the project in the April 2010 issue of Scrapbooks Etc HERE, but I thought I’d recreate the instructions for you since I don’t know how long that link will be available and with my hybrid modifications :)

Supplies I used: (not all shown- I forgot to take the picture before I started)

topiary-supplies

*Digital kit - I used Pink Lemonade by Marni Designs - I printed papers on 10 sheets double sided (regular copy paper) and ended up with 4 partial sheets leftover. You could do this project with 7 double sided sheets, and elements printed on cardstock.

*6” terra cotta pot

*6”round foam ball

*foam block for inside pot

*5/16x12” dowel rod

*2 sizes of heart punches

*circle punch or template and cutter

*corsage pins - I got a pack of 48 for $1.99 at Michaels and had quite a few leftover

*buttons - I found this great “Bucket of Buttons” for $5.99 at Michaels

*Tacky Glue (or other liquid glue)

*hot glue

*acrylic paints

*fake moss stuff

To assemble the flowers:

For each flower, punch one circle and 6 hearts.

topiary-flower-pieces

Fold each heart in half

topiary-fold1

And in half again, keeping the folds close to the point.

topiary-fold2

topiary-fold3

Put a dot of glue in the center of the square and attach the points. It is easiest to put 2 across from each other first and then fill in the sides.

topiary-glue

They do not have to be exact - I prefer a more homemade uneven-ness :) And we’re going to be covering the centers with buttons anyway.

topiary-glued-flower

After the glue is dry, you can push the petals down a bit to cover the circle. I found that if I messed them too much while the glue was wet, they just pushed out of place.

Make some big flowers and more small ones. They look really cute with small petals layered on top of larger ones too!

Put a button on a corsage pin and push through the center.

topiary-finished-flower2

topiary-finished-flower

To assemble the topiary:

Put the foam block in the pot, the dowel in the foam and the foam ball on the rod. Hot glue in place.

Insert the pinned flowers into the foam ball. As you maybe can see, I had trouble getting the flowers arranged perfectly to cover all of the ball. I used leaves, swirls and flourishes from the kit, as well as paper strips curled around a pencil to fill in some of the more bare spots, but again it’s more of that homemade imperfection ;)

Hybrids 6-13-10 004

I painted the pot and dowel rod. I also used a digital ribbon to embellish the rim of the pot.

topiary-1

I had a lot of fun putting this together and it definitely cheers up my desk, but it was time consuming. I found that I could put together about 7 flowers in an hour. I made 10 large and layered flowers and 14 small ones. Factor in drying time, painting, and arranging - I must have rearranged half a dozen times trying to get the best coverage lol, and cutting and attaching the extra elements… it is a pretty big project. But I love it so it was definitely worth it! And besides all that, it matches the bowl you see next to it that Tyler made me a couple months ago! :)

And speaking of Tyler, he had his best friend’s birthday party on Friday, so I made this card for him to give:

card2

I used Little Buddy by Marni Designs. I double printed the kraft stars and attached them with pop dots to give it some dimension and then I made an envelope to attach to the inside for him to put the gift card in!

inside-envelope

I hope you have enjoyed seeing my latest hybrid projects and maybe I’ve inspired you to create something fun!

Wendy